 Introduction
of Mmlib Background
Operation
Guide Reference Manual
Introduction
of Mmlib Background
Operation
Guide Reference Manual
- Main window
- Kind of items
- File Menu
- New
- Open
- Close
- Change information
-
Delete, File Pack
-
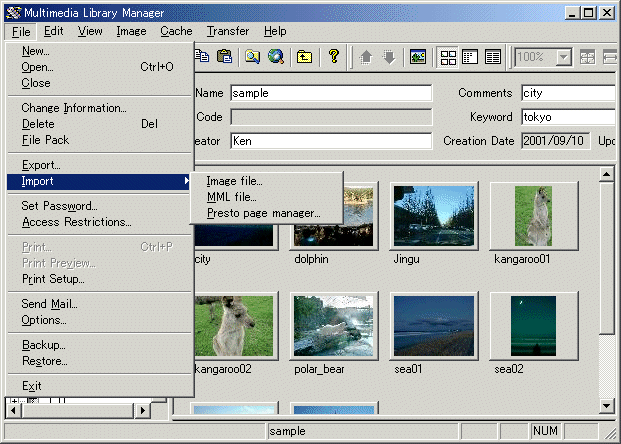
Export, Import
-
Set password, Access Restrictions
-
Print, Print Preview, Print Setup
-
Send Mail
-
Options
-
Backup
-
Restore
- Edit Menu
- Image Menu
- View Menu
- Cache Menu
- Transfer Menu
- Help Menu
The window displayed at the starting of the Mmlib is called main window. The
main window consists of title bar, menu, tool bar, view, and status bar. View is
the field where various items are displayed. The divided left side is called
"tree view", and right side is called "list view". Next, the items displayed
into a view are explained.

Kind of items
- Multimedia Library
This is the whole multimedia library.
- Inbox
This is the library where a folder is made automatically and data is
registered.
- Library (database)
A mass of library containing data or the folder. A database file exists in
this unit.
- Group folder
The folder for storing a folder. Data cannot be created in this folder.
- Data folder
The folder for storing data. A folder cannot be created in this folder.
(Note: A group folder and a data folder may be collectively called folder)
- Data
They are text and image data.
- Data search folder
This folder will be created when data is searched, and the searched data
enters in this folder automatically.
- Folder search folder
This will be created when folders are searched, and the searched folder
enters in this folder automatically. (Note: A data search folder and a
folder search folder may be collectively called search folder)
- Error library
It is the library that was not be able to be opened by some causes -- a
database file was not found or a network could not be connected. Operation
except closing cannot be performed.
Back to contents
File menu > New
Depending on the item
selected, it performs the following operations.
Back to contents
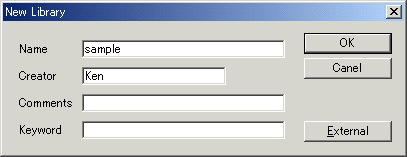
- Name
Name of a library is inputted
- Creator
Creator of a library is inputted. The logon name of Windows is
displayed as an initial value.
- Comments
Input comments if needed.
- Keyword
Input keywords if needed. This can be used as a search keyword.
The function below is available only in the Network
version.
Click the [External] button when you want to create a library on the other
directory or the network server. Additional information is displayed on the
dialog. (Note: PCSERVE is necessary to work on the server in the case you use
this function.)
- Connection method
Specify the method to connect the server.
-
Local --- Library is created on the local disk.
-
TCP/IP --- Connection is made by TCP/IP. Library is created on the server.
-
NETBIOS --- Connection is made by NetBIOS. Library is created on the server.
- Server name
Input the name of a server on which the PCSERVE works when
TCP/IP or NETBIOS is chosen as a connection method.
- Directory
Specify the directory to save the library.
- Cache use
Check this when you use cache. When cache is used, access to
a library can be suppressed to the minimum. Therefore, the operation speed
can be raised even when using the server on a slow network. If you are using
a server on the LAN, you should not check this box. (Disk capacity becomes
useless, in order to use a local disk for cache.)
Back to contents
Back to File menu > New
Creating New Folder

-
Type
Choose a folder type to be created.
- Group folder --- The folder for putting in a folder is created.
- Data folder ---The folder for putting in data is created.
-
Name
The name of a folder is inputted.
-
Creator
The creator of a folder is inputted. The logon
name of Windows is displayed as an initial value.
-
Comments
Input comments if needed.
-
Keyword
Input keywords if needed. This can be used as a
search keyword.
-
Text Data
Text data can be pasted in the window.
-
Prev. Data Copy
Information of the previous data is
copied in the input columns.
Back to contents
Back to File menu > New
Creating New Data
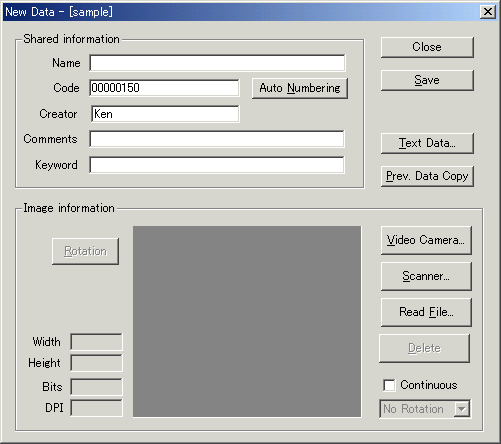
Create a new data. It enables to import a picture from a video
camera, an image scanner, and an existing picture file.
Shared information
Fill in "name", "code", "creator", "comments", and "keyword". Other than the
"name" column is arbitrary to be input. Except for the name column, the input is
optional. The given information could be the search target in search function.
-
Name --- The name of this data is inputted. This name is
shown on a tree view or a list view.
-
Code --- The arbitrary code for discriminating data is
inputted. It can display the data in order of a code on a tree view or a
list view. It is convenient if you put in the page number etc. Auto
numbering of the code is also possible.
-
Creator--- The user name of this data is inputted. The logon
user name of Windows is displayed by default.
-
Comments --- Arbitrary comment is inputted.
-
Keyword --- This can be used as a search target.
-
Auto Numbering --- It is the function that adds the
following code automatically when you put new data. When you click this
button, the following dialog is displayed.
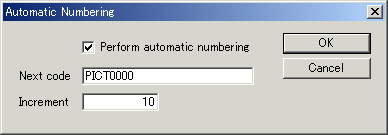
In this dialog, check the [Perform automatic numbering] box and input an
arbitrary code with number. Increment is added to the number in the code
each time and the new code is inputted automatically. In this case, the
following code becomes PICT0000, PICT0010, PICT0020, and so on.
Image information
Images are imported from a video camera, image scanner, or a picture file.
- Video camera --- Video capture dialog is displayed. For this function, you
need a video camera and a video capture board.
- Scanner --- Image is imported from an image scanner. For this function, you
need a TWAIN compatible image scanner. When you have a trouble in importing
images from a scanner, check the setting of a TWAIN driver in the Option menu.
- Read file --- Import picture files (BMP, JPG, GIF).
- Delete --- Delete the imported images.
- Continuous --- Picture is imported and saved continuously, with displaying
each window of a video camera or an image scanner. In this option, it is
convenient to use Auto numbering at the same time. When you finish import, click
the Cancel button or the Close button. If the rotation is specified, all of the
imported images are rotated in that direction and saved.
- Rotation --- Imported picture is rotated.
Text Data
Text can be pasted in the window.
Prev. Data Copy
Information of the previous data is copied in the input columns. This button
does not work at the first time.
Back to contents
Back to File menu > New
The item selected is open. Depending on the item
selected, it performs the following operations.
- Multimedia library is selected -> Open library
- Other items (library or folder) are selected -> The contents in the item is
open
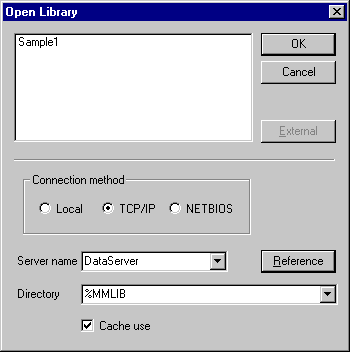
Open Library (When the Multimedia Library is selected)
Open the existing library. Choose the library from the list and click the OK
button.

The function below is available only in the Network
version.
Click the External button when you want to open a library on the other
directory or the network server. Additional information is displayed on the
dialog. (Note: PCSERVE is necessary to work on the server in the case you use
this function.)

- Connection method
Specify the method to connect the server.
- Local --- Open a library on the local disk.
- TCP/IP --- Connection is made by TCP/IP. Open a library on the server.
- NETBIOS --- Connection is made by NETBIOS. Open a library on the server.
- Server name
Input the name of a server when TCP/IP or NETBIOS is chosen as a connection
method.
- Directory
Specify the directory that has a library to be open.
- Cache use
Check this when you use cache. When cache is used, access to a library can
be suppressed to the minimum. Therefore, the operation speed can be raised
even when using the server on a slow network. If you are using a server on
the LAN, you should not check this box. (Disk capacity becomes useless, in
order to use a local disk for cache.)
Back to contents
The item selected is closed. Depending on the item
selected, it performs the following operations.
- Multimedia library is selected -> Library is closed.
- Other items are selected -> The class of one-step downstairs is closed.
The information of the selected item is changed. Depending on
the item
selected, it performs the following operations.
Change library information
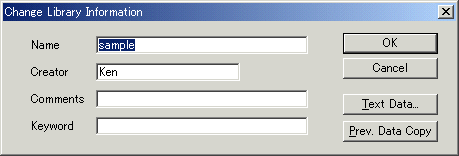
Change the library information. Input the information and click the OK
button.
- Name
Name of a library is inputted
- Creator
Creator of a library is inputted. The logon name of Windows is
displayed as an initial value.
- Comments
Input comments if needed.
- Keyword
Input keywords if needed. This can be used as a search keyword.
- Text Data
Text data can be pasted in the window.
- Prev. Data Copy
Information of the previous data is copied in the input
columns.
Back to contents
Back to Change information...
Change folder information
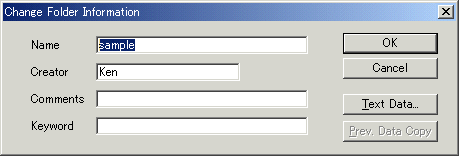
Change the folder information. Input the information and click the OK
button.
- Type
Choose a folder type to be created.
- Group folder --- The folder for putting in a folder is created.
- Data folder ---The folder for putting in data is created.
- Name
The name of a folder is inputted.
- Creator
The creator of a folder is inputted. The logon name of Windows
is displayed as an initial value.
- Comments
Input comments if needed.
- Keyword
Input keywords if needed. This can be used as a search keyword.
- Text Data
Text data can be pasted in the window.
- Prev. Data Copy
nformation of the previous data is copied in the input
columns.
Back to contents
Back to Change information...
Change data information
Change the data information.
Shared information
Fill in "name", "code", "creator", "comments", and "keyword". Other than the
"name" column is arbitrary to be input. Except for the name column, the input is
optional. The given information could be the search target in search function.
- Name --- The name of this data is inputted. This name is shown on a tree
view or a list view.
- Code --- The arbitrary code for discriminating data is inputted. It can
display the data in order of a code on a tree view or a list view. It is
convenient if you put in the page number etc. Auto numbering of the code is also
possible.
- Creator --- The user name of this data is inputted. The logon user name of
Windows is displayed by default.
- Comments --- Arbitrary comment is inputted.
- Keyword --- This can be used as a search target.
- Auto Numbering --- It is the function that adds the following code
automatically when you put new data. When you click this button, the following
dialog is displayed.
In this dialog, check the [Perform automatic numbering] box and input an
arbitrary code with number. Increment is added to the number in the code each
time and the new code is inputted automatically. In this case, the following
code becomes PICT0000, PICT0010, PICT0020, and so on.
Image information
Images are imported from a video camera, image scanner, or a picture file.
- Video camera --- Video capture dialog is displayed. For this function, you
need a video camera and a video capture board.
- Scanner --- Image is imported from an image scanner. For this function, you
need a TWAIN compatible image scanner. When you have a trouble in importing
images from a scanner, check the setting of a TWAIN driver in the
Option
menu.
- Read file --- Import picture files (BMP, JPG, GIF).
- Delete --- Delete the imported images.
- Continuous --- Picture is imported and saved continuously, with displaying
each window of a video camera or an image scanner. In this option, it is
convenient to use Auto numbering at the same time. When you finish import, click
the Cancel button or the Close button. If the rotation is specified, all of the
imported images are rotated in that direction and saved.
- Rotation --- Imported picture is rotated.
Text Data
Text can be pasted in the window.
Prev. Data Copy
Information of the previous data is copied in the input columns. This button
does not work at the first time.
Back to contents
Back to Change information...
Selected data or the folder is deleted.
File Pack
File size is reduced. This is done by the deletion of the unnecessary empty
area in the database that was done by data deletion.
The selected data folder and selected data in a library are exported to an
external file. Data is exported to a picture file (BMP/GIF/JPG) and a data
folder is exported as an original multi-picture file (.MML). A multi-picture
file can be displayed by the "Multimedia Library Viewer" (MLIBV). This function
corresponds to drag & drop. When the selected item is dropped on the desktop of
Windows, a file will be created automatically.
Import
An external picture file is imported to the selected folder. The file that
can be imported is as follows.
- Data folder -> Picture files (BMP/GIF/JPG) and multi-picture files.
- Group folder -> Multi-picture files only.
This function corresponds to drag & drop. If an external file is dragged and
it dropped to the item in a window, the file will be imported automatically.
Back to contents
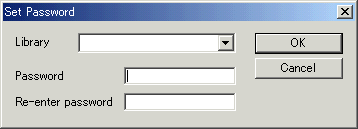
Set Password
A library is protected with a password.
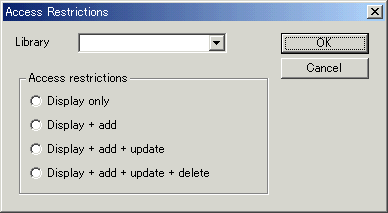
Access Restrictions
It prevents deleting or changing a library accidentally. Access is restricted
to the "Display only", "display + addition", "display + addition + update", or
"display + addition + update + delete".
The picture currently displayed is printed. A folder cannot be printed.
Print Preview
The picture currently displayed is previewed. A folder cannot be previewed.
Print Setup
Selection and a setup of a printer are performed.
Back to contents
The mail software that is installed in your computer can send
message with selected data or data folder. Mail software starts with picture
file (BMP/GIF/JPG) attached when the data is selected. Also it starts with
multi-picture file when the data folder is selected.
System environment is set up.

- Library
Specify the directory to create a library.
- Backup
Specify the directory to save a backup file.
- Cache
Specify the directory to use cache.
- Inbox
Specify the directory for Inbox.
- Keyword index
Specify the directory for keyword index.
- Standard value
Above settings are returned to the regulation value of a
system.

- View font
Specify the font used in the tree view and list view. Click
the Change button. Font selection dialog is displayed.
- Dialog font
Choose a font size used in the dialog.
- Standard value
The above settings are returned to the standard value of
the program.

- Tree view display order
Display order of the item is set. The priority
of rearrangement of the item is decided. In the above figure, items are
arranged in the order of name. Items with same name are rearranged in the
order of code, creation date, update date, and so on.
- Up/Down
To change the order of the item, choose the item and click up
or down button.
- Display text
Style of the text on the tree view (displayed on right
hand of the icon) is set as "name (code)" or "name only".
- Reduced image size
Change the image size at the time of thumbnail display.
- Normal: Small size
- x2 (fast): Image size is twice but the resolution is low for the fast
display.
- x2 (fine): Image size is twice and resolution is kept fine.。
- Standard value
- The above settings are returned to the standard value.

- Twain
Selected twain driver is shown.
- Select driver
Driver list is displayed. Select the driver to be used. Twain compatible
devices can be used.
Back to contents
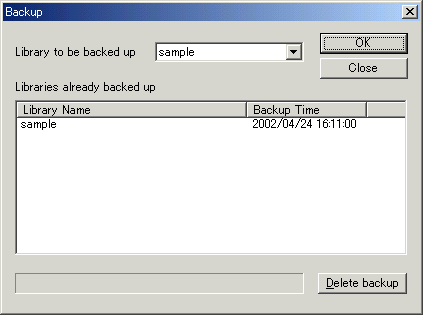
It backs up the libraries. Choose the library to be backed up and then click
the "OK" button. By restoring, the library can be
returned to the backed-up state.
- Library to be backed up
Choose the library to be backed up.
- Libraries already backed up
Backed-up libraries are listed.
- Delete backup
Deletes the unnecessary backup file. Choose the library
to be deleted and click this button.
Back to contents
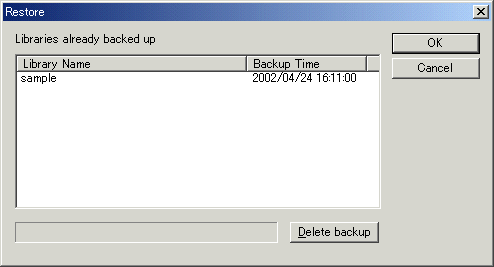
Restore the backed up libraries. Choose the library to
be restored and click the OK button.
- Libraries already backed up
Backed up libraries are displayed.
- Delete backup
Unnecessary backup file is deleted. Choose the unnecessary library and click
this button.
Exit
Terminates the program.
Back to contents
- Undo
It is not supported in the present version.
- Cut
It is not supported in the present version.
- Copy
The picture currently displayed is copied to a clipboard.
- Paste
It is not supported in the present version.
- Select All
All the items currently displayed on the list view are
selected.
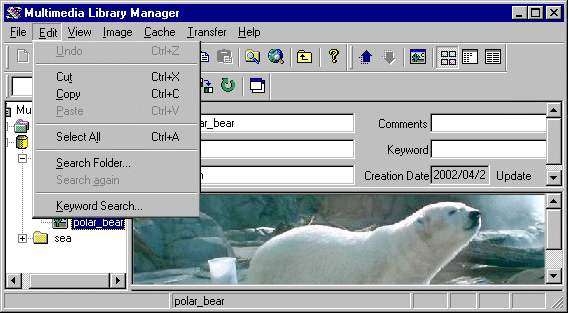
- Search Folder
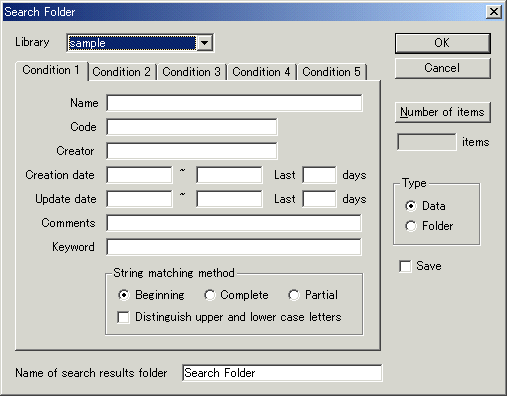
Input search conditions and click the OK button. Search folder is created and
the found data or folder is stored in it automatically. Any number of search
folders can be created.
- Library
Choose the library to be searched.
- Condition 1-5
Data in Name - Keyword is AND searched and conditions
1-5 is OR searched. For example, when ABC and NAME1 are specified in Name
and Creator in condition 1, XYZ and NAME2 in condition2, the search method
is (Name=ABC AND Creator=NAME1) OR (NAME=XYZ AND Creator=NAME2).
- String matching method
- Beginning
It searches data beginning with inputted string. When ABC is inputted,
all of ABC, ABCD, ABCXYZ fit the search key.
- Complete
It searches data that matches completely with the inputted string. In
the above example, only ABC fits the search key.
- Partial
As a wild card, * (matches with complete string) and ? (matches with
arbitrary one character) can be used. For example, when inputted as
*ABC*, all the data containing ABC is found.
- Type
- Data: Only data is searched.
- Folder: Group folder and data folder is searched.
- Save
If checked, the search condition is saved. Search folder is displayed at the
next start of the program.
- Number of items
It displays a number of items that fit to the search
condition.
- Name of search results folder
- Name of the search folder is inputted.
- Search again
Items are re-searched and the item in a reference folder is updated in the
newest state.
- Keyword Search
A keyword search index is created. It searches based on the input keyword.
Back to contents
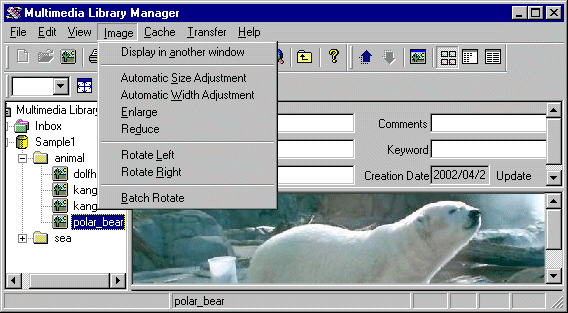
- Display in another window
Another window, where only the image is shown, will be open.
- Automatic Size Adjustment
According to window size, display size is
automatically adjusted so that the whole picture is displayed.
- Automatic Width Adjustment
The width of a picture is automatically
adjusted according to the width of a window.
- Enlarge
A picture is expanded by 1.5 times.
- Reduce
A picture is reduced to 1/1.5.
- Rotate Left
A picture is rotated 90 degrees on the left.
- Rotate Right
A picture is rotated 90 degrees on the right.
- Batch Rotate
The picture contained in selected data or the selected
folder is rotated by package.
Back to contents
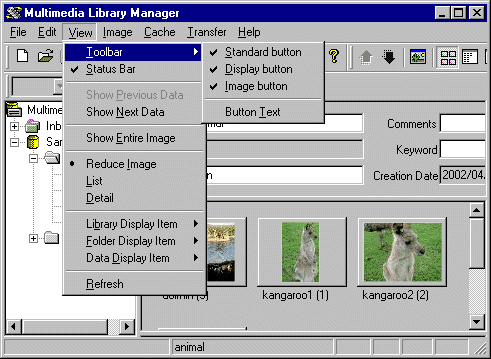
Toolbar
The state of a tool bar is set up. A tool bar is the small button located in a
line with the bottom of a menu.
It is divided into the "Standard button" and the "Image button." The "Standard
button" is displayed on left side, and the "Image button" is displayed on right
side.
- Standard button: changes a display / un-display of Standard button.
- Display button: changes a display / un-display of Display button.
- Image button: changes a display / un-display of Image button.
- Button Text: A function name is displayed on the bottom of the button.
Status Bar
It changes a display / un-displaying of a status bar. Status bar is at the
bottom of a window and it displays the state of a program, and the name of an
item selected.
Show Previous Data
The previous data is displayed.
Show Next Data
The following data is displayed.
Show Entire Image
The whole picture is displayed on the window.
Reduce Image
A picture is reduced and displayed.

List
Items are displayed in a list form.

Detail
Items are displayed in detailed form. When the header of a list view is clicked,
it will rearrange and display by that item. If the same item is clicked twice,
it will display on the reverse order.

Library Display Item
The display item of a library is selected at the time of detailed display.
Folder Display Item
The display item of a folder is selected at the time
of detailed display.
Data Display Item
The display item of a data is selected at the time of
detailed display.
Refresh
The contents of a display are updated in the newest state. It is
used mainly to reflect the contents updated by others when the library is shared
by the network.
Back to contents
This menu is used only in the network version.

This menu becomes effective only when the picture database on a remote server
is open from the "open" of the file menu with "cache use" checked.
Cache is the structure for accelerating the access. The data read from a library
on a remote server is saved on the local disk. And it is accessed there from the
next time. Operation efficiency can be raised especially in a low speed network
environment.
Batch Read
All of the folder and data below the specified item are read in cash. Thereby,
access of the data below this folder is accelerated.
Delete
Selected cache of the library is deleted.
Back to contents

OCR software
Image software
Registered applications for transferring data are shown. They will be displayed
when you setup the "Register Application" mentioned below
Register Application...
The application for transferring data is registered.

Back to contents

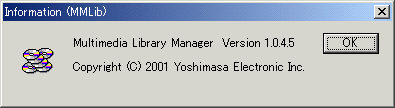
About Mmlib..
The version information on a program is displayed.
Online Manual
This page is displayed.
Online Update
A program is updated to the latest state through the internet. When the computer
is connected to the Internet, it can be performed at any time.
Back to contents
